
There’s something truly special about a handcrafted bouquet—it’s personal, heartfelt, and effortlessly beautiful. Whether you’re creating one as a gift, for a special event, or simply to brighten up your home, knowing how to make a bouquet of flowers allows you to showcase creativity while working with nature’s most stunning elements.
You don’t need professional experience—just a love for flowers, a bit of patience, and some basic floral arrangement techniques. This guide will walk you through each step, from selecting the freshest blooms to crafting a balanced, harmonious bouquet that captures your vision.
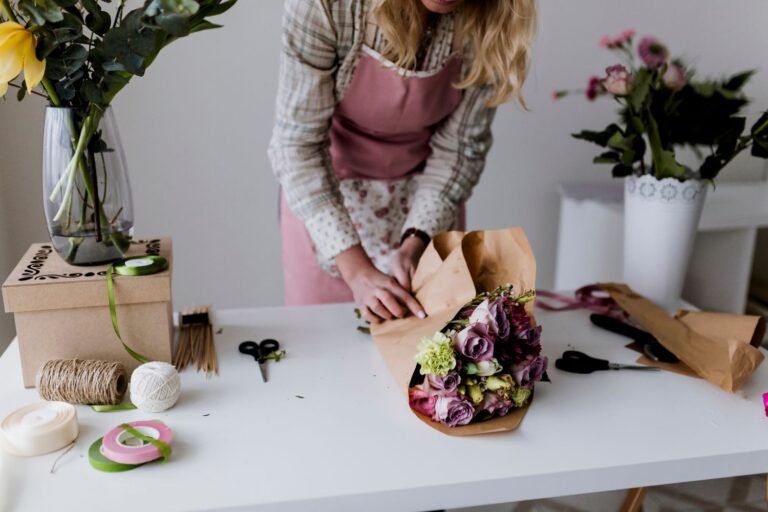
Step 1: Tools and Materials You’ll Need
Before diving into the art of bouquet-making, let’s talk essentials. Whether you’re crafting a romantic hand-tied bouquet or a vibrant centerpiece, having the right materials makes all the difference. The goal? A stunning arrangement that looks effortlessly elegant—but trust me, even professionals rely on a few key tools to get that “just-picked-from-the-garden” perfection.
1. Fresh Flowers
Your bouquet is only as good as the blooms you choose, so flower selection for bouquets is step one. Look for vibrant, healthy flowers with firm petals and lush foliage—no droopy stems or wilting leaves allowed. Some go-to blooms for DIY flower bouquet tutorial include:
- Roses – A timeless classic, romantic and sophisticated, roses are always a good idea.
- Tulips – Perfect for soft, playful elegance, tulips are easy to combine.
- Peonies – Fluffy, full, and instantly luxurious, peonies will elevate any bouquet.
- Lilies – Bold and fragrant (just be mindful of their pollen).
- Seasonal Blooms – Freshness and availability matter, so ensure the best quality.
Pro Tip: Mix textures! Pair large, statement flowers with delicate filler blooms and lush greenery for a balanced, dimensional look.
2. Essential Tools
A florist is only as good as their tools, and even the simplest bouquets deserve some precision and care. Here’s what you’ll need:
- Floral Shears or Sharp Scissors – For clean, angled cuts (because crushing stems with dull scissors is a floral crime).
- Floral Tape – Keeps stems together without slipping—especially helpful for creating hand-tied bouquets.
- Ribbon or Twine – The final wrap that adds both structure and style.
- A Clean Work Surface – Trust me, flower arranging gets messy. Protect your space and keep things organized.
3. Additional Supplies (Optional but Fabulous)
Want to elevate your bouquet beyond a simple tied bunch? These extras help with presentation and longevity:
- Vases or Floral Foam – Great for structured arrangements or gifts that need stability.
- Water Tubes – Perfect for keeping stems hydrated if they won’t be placed in water immediately.
- Decorative Wraps & Gift Boxes – A bouquet is a gift in itself, but wrapping it beautifully takes it to the next level. A touch of Parisian charm? Yes, please.
Once you’ve gathered your materials, you’re ready to move on to selecting and prepping your flowers—because a little prep work goes a long way in making sure your bouquet looks fresh and lasts longer!
Step 2: Select and Prepare Your Flowers
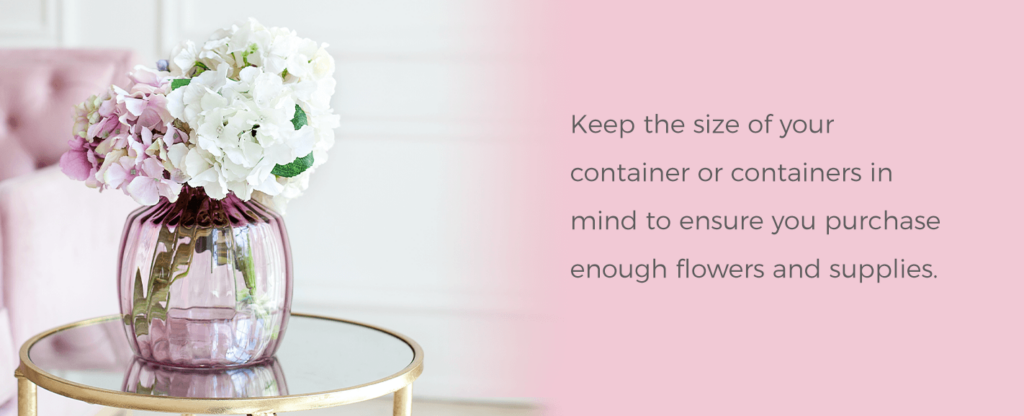
Now that you have your tools, it’s time to gather the most important material. Selecting your flowers is the most exciting step because you can choose whichever blooms are your favorite. Learn how to design a flower bouquet and search for blooms in your favorite color or variety, unique shapes and colors, or ones in-season where you live. Keep the size of your container or containers in mind to ensure you purchase enough flowers and supplies.
Look for your perfect blossoms and accent elements to create the best bouquet of flowers and use lovely color options. Get inspired with these suggestions:
1. Choosing Fresh Blooms
The secret to a breathtaking bouquet? Start with the freshest flowers possible. Whether you’re handpicking blooms from a florist or selecting them from your garden, look for:
- Firm, strong stems – Floppy, weak stems won’t hold up well in arrangements.
- Bright, unblemished petals – Avoid flowers with brown spots or wilting edges.
- Slightly closed buds – Blooms that are just beginning to open will last longer.
- Healthy, green leaves – Yellowing or droopy leaves signal aging flowers.
If you’re purchasing flowers, ask the florist when they were delivered to get the freshest selection. Floral design basics suggest seasonal flowers tend to be the best choice for longevity and affordability.
2. Preparation Steps
Prepping your flowers correctly ensures they look beautiful and last as long as possible. Follow these essential steps:
- Trim the Stems: Using sharp floral shears, cut about an inch off the bottom of each stem at a 45-degree angle. This increases the surface area for water absorption, keeping your flowers hydrated longer. Avoid crushing the stems, as this can block water uptake.
- Remove Excess Leaves: Strip off any leaves that will sit below the waterline in a vase or beneath the bouquet’s tie. This prevents bacterial growth and keeps your bouquet looking neat and polished.
- Hydrate Your Flowers: Freshly cut flowers need a good drink! Place them in room-temperature water for at least an hour before arranging. Some flowers—like hydrangeas—benefit from deep water immersion, where you soak the entire stem for extra hydration.
Once your flowers are trimmed, hydrated, and ready to go, it’s time for the fun part—flower arranging for beginners and pros alike: crafting a stunning bouquet!
Step 3: Arranging the Bouquet
Now that your flowers are prepped and ready, it’s time for the most exciting part—arranging them into a stunning bouquet. This process involves creating a strong foundation, layering with filler flowers and foliage, and securing the arrangement so it stays beautifully in place.
1. Establishing the Foundation
Every great bouquet starts with a strong foundation. Begin by selecting three to five main flowers as your focal point—these will be the stars of your arrangement. Hold them in one hand, positioning them slightly off-center to create a natural, dynamic look instead of a rigid, flat arrangement.
As you add flowers, use the spiral technique—a method where you angle each new stem slightly as you place it around the base flowers. This ensures that your bouquet maintains an open, airy shape rather than feeling tight or cluttered.
2. Incorporating Filler Flowers and Foliage
Once the main flowers are in place, it’s time to add filler flowers and greenery. Filler flowers, such as baby’s breath, wax flowers, or delicate sprigs of lavender, provide texture and help blend your focal blooms together. Greenery—like eucalyptus, ferns, or ruscus—adds depth and movement, creating a lush, balanced bouquet.
When adding these elements, position them at different heights to mimic the natural way flowers grow. This technique gives the bouquet a fuller, effortless appearance while allowing each bloom to shine.
3. Securing the Arrangement
Once you’re happy with your bouquet’s shape and balance, it’s time to secure everything in place. Wrap floral tape around the stems just below the flower heads to hold the bouquet together. Then, use ribbon, twine, or decorative wrap to give your bouquet a polished, finished look.
For added stability, trim the stems at an even length and place the bouquet in a vase with fresh water until it’s ready to be gifted or displayed.
By following these steps, you’ll create a bouquet that looks effortlessly elegant and stays beautifully intact!
Step 4: Prep Your Vases
With your tools, materials, and fresh flowers ready, begin preparing your vases for your floral arrangement. You can turn almost any container in your home into a vase for flowers. Your favorite mug or glass cup with intricate details will be the perfect container for your bouquet of flowers. Or go larger with a grand vase.
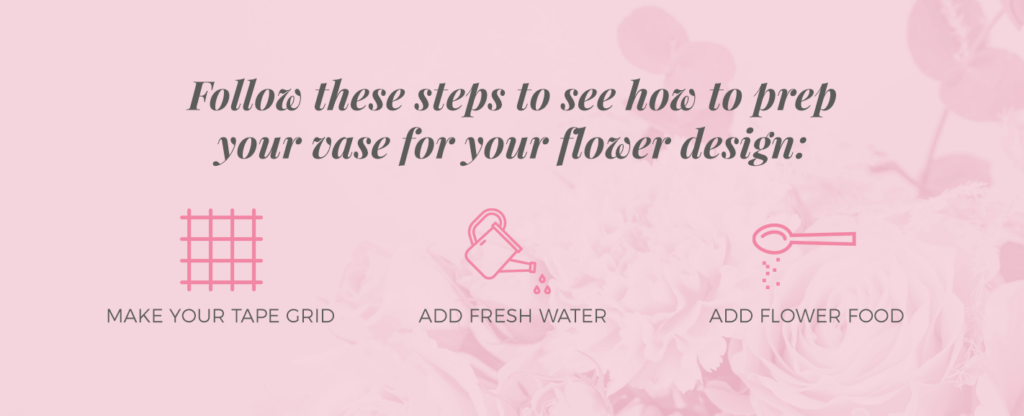
Follow these steps to see how to prep your vase for your flower design:
- Make your tape grid: Your first task is to assemble a grid with clear floral tape at the top of your vase. This step will help you methodically place flowers in your vase and support the blooms for a nice arrangement shape. Once you’ve created the tape grid, secure it by taping around the rim of the container.
- Add fresh water: Fill your vase up generously with fresh water in preparation for your lively flowers. A helpful tip for keeping your flowers alive longer is to change your water every day. If you don’t have time every day, every other day is fine. Leaving your flowers in water any longer could cause bacteria growth and decrease the life of your flowers.
- Add flower food: Stir in the flower food to help preserve your flowers. Follow the directions on the packet to measure the correct amount, or dust in small amounts to each vase so you have some leftover for more floral arrangements.
Step 5: Prep and Position Your Flowers
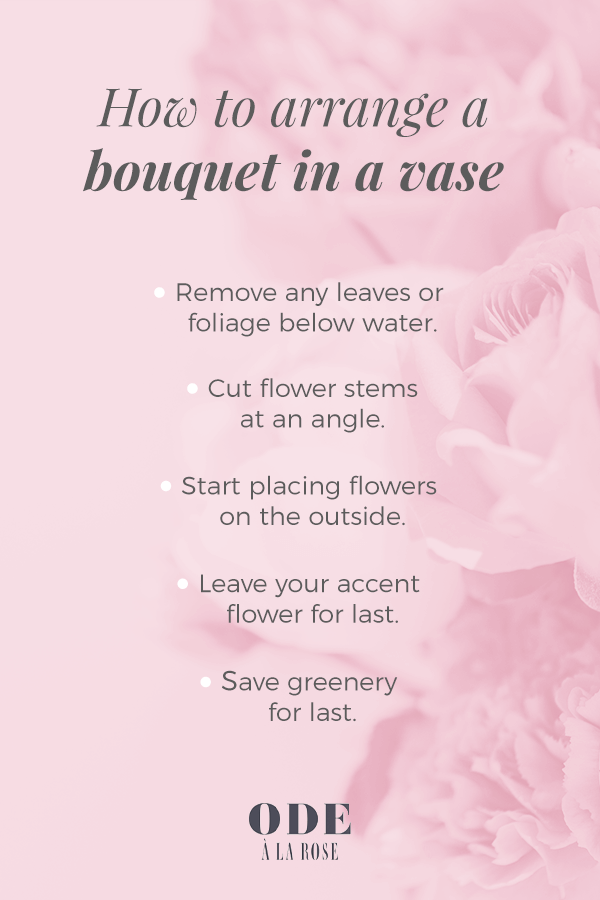
After you’ve prepared your vases, it’s time to understand how to arrange a bouquet in a vase. Before you place your flowers into the vase, it’s best to complete a few essential steps to make your floral arrangement look great and last for a long time.
Learn how to arrange a bouquet and prepare your flowers with these flower arrangement techniques:
- Remove any leaves or foliage that will be below water: Removing the leaves or foliage that would sit below the water is an essential step while you prep your flowers. Leaves in the water will lead to extra bacteria growth, causing your flowers to wilt faster. Keep a few leaves at the top of the flower if you’d like to add some texture and color to your arrangement.
- Cut flower stems at an angle: You’ll need to cut the flower stems so they fit nicely in your vase. Clip them at an angle to increase the flowers’ water absorption. After you trim your stems, it’s best to arrange flowers in a vase immediately so they don’t dry out.
- Start placing flowers on the outside: A beneficial flower arranging tip is to start placing your flowers in the outer edge of the vase and work your way in. Start with one type of flower and move on to the other types as you fill up your vase.
- Leave your accent flower for last: Save the best for last as you’re arranging your blooms. Since your accent flower is special, add it to your design at the end. It’s best to place them above the other flowers so they have room to be full and stand out.
- Save greenery for last: Now that you’ve placed all the flowers in the vase, see if there is room to add any greenery. After using the tape grid and placing all of your flowers, you might not need any greenery. Fill in small gaps or add more volume if you think it will help enhance your floral design.
Step 6: Step Back and Make Any Final Tweaks
Now it’s time to make the finishing touches to your lovely bouquet of flowers. During this step, you can trim up some of the stems more, move flowers around, add more flowers or greenery, and make your arrangement look perfect. At this stage, look at the arrangement from all angles and see if any spots need extra attention.
Once all of your fresh blooms are in place, consider adding some embellishments like ribbon, gems, fabric, and more details to complete the look of your flower bouquet.
With those steps complete, you’ve successfully created your DIY flower arrangement! You can keep your beautiful creation alive longer by storing it in the refrigerator overnight. This step will allow you to enjoy the presence of your flowers as long as possible.
After learning how to make a floral arrangement, you can start creating them more often and fill your home with gorgeous floral bouquets.
Tips for Longevity
Want your bouquet to stay fresh and beautiful for as long as possible? Here’s how to maintain your arrangement like a pro:
Water Maintenance
- Change the water every two days to prevent bacteria buildup.
- Use room-temperature water with flower food for best results.
- Trim stems slightly with each water change to help absorption.
Stem Care
- Keep stems trimmed at an angle to maximize hydration.
- Remove any submerged leaves to avoid decay.
- Avoid placing flowers in direct sunlight or near heat sources.
Environmental Factors
- Keep flowers away from fruits—they release ethylene gas, which speeds up wilting.
- Store bouquets in a cool, well-ventilated area when not displayed.
- If possible, mist petals lightly to retain moisture.
Tips for Creating Stunning Bouquets
Making a bouquet isn’t just about putting flowers together—it’s about creating a balanced, visually appealing arrangement. Here’s how to ensure your bouquet is a showstopper:
Color Coordination
Color plays a huge role in how a bouquet feels and looks. A well-coordinated bouquet should have a harmonious color palette rather than a chaotic mix of colors that clash. Choose complementary shades that work together naturally—soft pastels with vibrant hues can create dimension and balance. For a classic, romantic look, stick to monochromatic tones like blush pinks and whites. If you want something bold, pair contrasting colors like deep reds with bright yellows.
Using greenery is one of the best tricks for balancing bright florals—it provides a natural transition between colors and enhances the bouquet’s overall structure. Don’t be afraid to experiment with different shades, as color coordination is what makes each bouquet unique and expressive.
Balance and Proportion
A bouquet should have a natural, effortless flow, rather than looking like a random bunch of flowers thrown together. The key to achieving this is proper placement. Start with larger statement blooms as focal points and distribute them evenly throughout the bouquet. Then, add medium-sized flowers and filler blooms to create depth and fill any gaps.
Florists often follow the rule of odds, using an odd number of flowers to make arrangements feel more organic and visually appealing. Pay attention to the shape of your bouquet, too—whether you prefer a round, cascading, or asymmetrical arrangement, balance is what keeps it looking polished and professional.
Seasonal Flowers
Choosing seasonal flowers is a smart and cost-effective way to ensure your bouquet is fresh, vibrant, and long-lasting. Seasonal blooms are not only more affordable, but they’re also at their peak beauty and sturdiness. Here’s a quick guide to what’s in season throughout the year:
- Spring: Tulips, peonies, daffodils, cherry blossoms—perfect for soft and delicate bouquets.
- Summer: Sunflowers, roses, dahlias, zinnias—ideal for bold, bright, and cheerful arrangements.
- Autumn: Chrysanthemums, marigolds, calla lilies—great for warm and rich-toned bouquets.
- Winter: Amaryllis, hellebores, evergreen sprigs, berries—perfect for cozy, holiday-inspired bouquets.
To add even more depth and texture, incorporate seasonal fillers like baby’s breath, eucalyptus, lavender, or ferns, which complement the main blooms and help create a fuller, more dynamic bouquet.
With these expert tips, your bouquet won’t just look stunning—it will feel perfectly curated for any occasion, whether it’s an elegant gift, a special event, or simply a way to brighten up your space.
Shop Our Farm Fresh Flower Stems to Incorporate Into Your Bouquet
Designing your own flower arrangement at home is a fun and creative activity. Every time you create a new bouquet, you can play around with new flowers, colors, vases, and design ideas. Use your new florist skills when you decorate for events like the holidays or parties or create thoughtful gifts for your friends and family.
If you’re looking for some beautiful blooms for your next DIY arrangement, check out the farm-fresh flowers from Ode à la Rose.
Our fresh from the farm flowers are some of the loveliest blooms you can receive directly to your front door. We carefully source our offerings from eco-friendly farms in Holland and Ecuador. When you order farm-fresh flowers, they are then carefully packaged and shipped to the U.S. for you to design elegant arrangements at home. Since the flowers are shipping directly from the farm to your home, they will be fresh and long-lasting if you properly take care of your stunning creations.

Ode à la Rose ships flowers nationwide. Take a look at our flower delivery zones to see what kind of delivery options are available for your city. Search through our other floral products or contact us with any questions about our fresh flowers.
Conclusion
Now that you know how to make flower bouquets, you have everything you need to create breathtaking, professional-looking arrangements from the comfort of your home. Whether it’s for a gift, a special occasion, or just to brighten up your space, a DIY flower bouquet tutorial is a fun, rewarding way to express creativity and bring a little more beauty into the world.
With fresh blooms, the right techniques, and a little bit of practice, you’ll be arranging flowers like a pro in no time. So go ahead—pick your favorite blooms, grab your tools, and create something truly stunning! Happy arranging!
P.S. If you realize this craft isn’t for you, no matter why, Ode à la Rose and our stunning bouquets are always just a click away.